


Lazy-Girl Bone Broth Recipe (3 Ways) & My Bone Broth Hot Chocolate Obsession
For better hair, nails, skin, gut health and domestic-queen energy


This is my first recipe post and I’m gonna try to not be like those annoying food blogs that start with “The history of bone broth” or “It all began on a cold winter day when my Grandma told my Mom her secret family recipe.”
I am just going to tell you…
It’s easy and it’s good for you
This is the best and most simple recipe ever, you just throw a few things into a pot and voila, your health and hotness level elevates with every sip.
It’s packed with collagen, minerals, and gut-healing properties, plus if you’re struggling to get 30g of protein at every meal, this will give you that boost of 10gs! If you’re looking for more skinny hacks, check out this post.
How to know if you did it right
You really can’t mess this up…but here are the success markers of a quality bone broth:
She should jiggle. The more gelatinous the better.
There should be a layer of fat that you need to scrape off after refrigerating.
You should be able to taste the beefiness, if it’s too watery you won’t enjoy it as much as the health benefits won’t be.
I keep it simple so it’s versatile
I never stray from the lazy-girl recipe because it lasts a few days, and my flavour preferences are mood dependant.
Some people like to add garlic, ginger, rosemary, and you totally can, but I prefer to just add some yum-yums afterwards when I am re-heating my portion for the day.
My favorite ways to drinks my bone broth:
Add salt and cayenne pepper for a metabolism boost. This is how I drink it pretty much every morning, and if I am feeling a bit under the weather I will grate some ginger in there too.
Sometimes I like to add asian 5 spice and it’s giving elevated Mr.Noodles broth.
Bone broth hot chocolate, which sounds gross, but you can’t taste the beef lol. That would be weird. I’ll give you the recipe to that at the end!
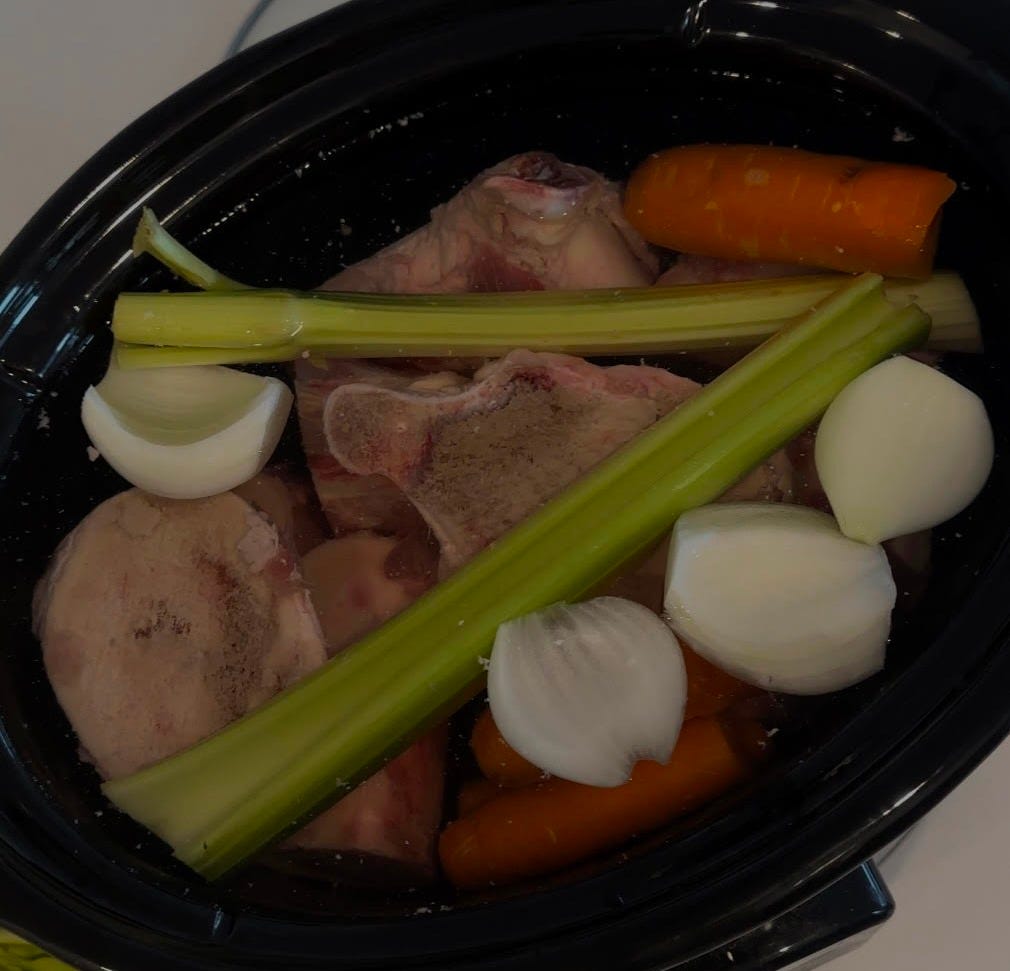
Ingredients:
This is for a portion that will give you a good 2 mugs full for 4ish days. If you’re making it for only one person, could freeze half of it because I wouldn’t drink it past day 4, it’s meat after all
2 lbs (or more) of high-quality beef bones. The knuckle is the best! But if you ask your butcher for soup bones they usually know what’s up. I always get grass-fed & organic, but you do you.
2 full carrots (No need to chop. I don’t even peal them, just give them a little rinse)
2 celery stalks (Don’t chop, just wash)
1 onion (skin removed, whole or halved)
Enough water to just cover the bones (You don’t want them floating. If some are sticking out a bit that’s fine too, they will move around a bit)
Optional: fresh herbs like thyme or rosemary, garlic, ginger (omit if you want to keep it simple or make bone broth hot chocolate)
Nutritional Facts (Per 1 Cup, Fat-Skimmed Bone Broth)
Calories: ~30-40 kcal
Protein: ~7-10g
Fat: ~0-1g (almost none if fully skimmed)
Carbohydrates: ~0-2g
Collagen/Gelatin: ~5-7g
Sodium: ~150-250mg (varies based on added salt)
Calcium: ~10-30mg
Magnesium: ~5-15mg
Phosphorus: ~50-100mg
Other minerals: Trace amounts of potassium, zinc, and iron
Cooking Methods:
Pressure Cooker (Instant Pot) – My Favorite!
Why? It only takes 3 hours, and it really gets the gelatin going.
Add bones, veggies, and optional herbs to the pressure cooker.
Pour in enough water to just cover the bones (but don’t overfill—too much water makes it watery! There should be a Max liquid line on your pressure cooker, don’t go past that).
Set to High Pressure for 3 hours.
Once done, let it sit for a bit, then let the pressure release. Since it’s been going for 3 hours it’s going to pack a lot of pressure and it’s going to fill your house with a beefy aroma lol.
I like to let it cool for a bit then I pick out the bones using tongs. I put the “discard” bones, celery and onions in one bowl, and then I put the meat chunks, carrot and bone marrow in another bowl (I will give you some recipes at the end on how to use that)
Strain the broth into a pot using a fine mesh strainer.
Store in the fridge overnight (if it’s still really hot, put a tea-towel or something underneath it in the fridge).
Once chilled, scrape off the fat layer on top and discard.
You are ready to drink! I just ladle it into a sauce pan every morning and add salt with anything I feel like for that day.
Stovetop – Traditional but Time-Consuming
Why? A classic method, but water can evaporate, and keeping a gas stove on for 10-14 hours can get expensive!
Add bones, veggies, and optional herbs to a large stockpot.
Cover with water (just enough to submerge the bones, but not so much they float).
Bring to a gentle simmer over medium heat, then reduce to low.
Cover with a lid that allows minimal evaporation and let it cook for 10-14 hours.
I like to let it cool for a bit then I pick out the bones using tongs. I put the “discard” bones, celery and onions in one bowl, and then I put the meat chunks, carrot and bone marrow in another bowl (I will give you some recipes at the end on how to use that)
Strain the broth into a pot using a fine mesh strainer.
Store in the fridge overnight (if it’s still really hot, put a tea-towel or something underneath it in the fridge).
Once chilled, scrape off the fat layer on top and discard.
You are ready to drink! I just ladle it into a sauce pan every morning and add salt with anything I feel like for that day.
Slow Cooker – Great If You Have Patience
Why? A set-it-and-forget-it method, but your house will smell like broth for a day or two and the water can evaporate depending on your lid.
Add bones, veggies, and optional herbs to a slow cooker.
Pour in water to just cover the bones.
Set to Low and cook for 24-48 hours (I don’t notice much difference between the two).
I like to let it cool for a bit then I pick out the bones using tongs. I put the “discard” bones, celery and onions in one bowl, and then I put the meat chunks, carrot and bone marrow in another bowl (I will give you some recipes at the end on how to use that)
Strain the broth into a pot using a fine mesh strainer.
Store in the fridge overnight (if it’s still really hot, put a tea-towel or something underneath it in the fridge).
Once chilled, scrape off the fat layer on top and discard.
You are ready to drink! I just ladle it into a sauce pan every morning and add salt with anything I feel like for that day.
The After-Math:
Test for Gelatin: When cold, your broth should be gelatinous. This means you used the right amount of water and some good bones.
Bone Marrow Bonus: Don’t waste it! Scoop it out and spread it on toast or eat it on its own. It’s so yummy and good for you. I give it to my dog too.
The Carrots & Beef Are Delicious Too: They soak up the flavor—sometimes I eat them after straining, or we feed to our dog, but be very careful of little bones! I actually made a delicious asian orange sauce with soy, hoisin, orange juice and zest, and some honey, then simmer the carrots and beef in the sauce and poured it over rice. So yummy, but it is quite fatty so I’m not doing that every week.
Customizing the Flavor: I mentioned my fav ways at the top of the page but experiment!
Soups & Rice: Use the broth to make a soup or add some into your rice. Sometimes I make a Spanish rice with bone broth, tomato sauce and garlic. It’s insane.
Bone Broth Hot Chocolate
Okay this is my fav little snack because it satiates my chocolate cravings and also has protein and healthy fats. I choose this over a protein powder shake any day.
Ingredients (1 Serving)
1 cup (240ml) bone broth (fat skimmed)
2 tsp cacao powder
1-2 tbsp coconut cream (for creaminess – use 1 tbsp for lighter, 2 tbsp for richer)
Splash of milk (any kind – about 2 tbsp)
1 tsp honey (adjust to taste)
1/4 tsp cinnamon (optional, but recommended)
Pinch of salt (enhances flavor)
Instructions
In a small saucepan over medium heat, add the bone broth and warm it up.
Whisk in cacao powder, stirring until fully dissolved.
Add coconut cream, milk, honey, cinnamon, and salt. Stir well.
Heat until warm but not boiling.
Pour into a mug and enjoy!
Nutrition Facts for Bone Broth Hot Chocolate (Per 1 Cup, Based on 1 Tbsp Coconut Cream & 2 Tbsp Whole Milk)
Calories: ~85 kcal
Protein: ~8g
Fat: ~5g
Carbs: ~6g (from honey & cacao)
For a richer version (2 tbsp coconut cream), add ~45 more calories and 5g fat.